Saturday, September 29, 2012

Organize Your Craft Supplies

Organizing is a breeze with the new sturdy, stackable organizers and craft boxes. You’ll always know where to find your supplies—safe and sound in these portable containers!


Small Organizer

Keep your accessories, My Acrylix® blocks, and other crafting supplies organized in this sturdy plastic, see-through, stackable storage container. 14½" × 10½"× 2".

$12.95 - Z4138


Craft Boxes Foam Insert

Fits inside the small organizer to securely hold 12 craft boxes.

$8.95 - Z4140


Craft Boxes

3 boxes, sturdy plastic with hinged lids, approximately 3" × 3" × 1".

$6.95 - Z4137


Medium Organizer

Keep your crafting supplies organized in this sturdy plastic, see-through, stackable storage container. Comes with removable dividers. 14½" × 10½" × 5".

$16.95 - Z4139

Wednesday, September 26, 2012

Terrific Two Tone...


Another great tutorial aired on My Craft Channel yesterday...“Terrific Two-Tone” features base and shade stamping for a terrific two-tone look!
In this tutorial they are using one of CTMH's 6 (SIX) new colors...SLATE!  I would have never thought that I'd be excited over a grey (color), but this new Slate color really is fab-u-lous!  If you haven't seen it yet, I encourage you to check out my earlier post 'One Fine Day'.


More about the tutorial...the stamp set they are using is called 'Love Blooms' (C1511) and it is as cute in person as it appears in the video.  I received this stamp in my 'gear' at the annual CTMH's consultant convention a couple of months ago and it was love at first sight!  Just when I thought I didn't need another flower stamp...they go and show me this one.  It's a keeper...I have used it countless times since Convention and I know I'll continue to use it over and over again.


This C-size stamp has 11 images - $13.95 (C1511)
If you'd like to purchase this stamp email me at kysprau@hotmail.com or shop my website 24/7 HERE!


Don't forget to check out the next installment of 'Clearly the Best' ... next Tuesday, Oct 2nd, at www.mycraftchannel.com

It's a Halloween Party in a Kit!


Your ghosts and goblins will love a themed party with jack-o-lantern party bags, spider web cupcake liners, a “Boo” banner, plus more spooky fun this Halloween. Our Workshops on the Go® Spellbound Cricut® Kit makes it easy!


Create a Halloween party for 8, including treat bags, cupcake picks and liners, soda wraps, and a banner.  The cute Spellbound paper packet is available in this kit ONLY! 

Workshops On The Go® Spellbound Cricut® Kit


Included in this kit: 
1 – My Reflections® Spellbound Paper Packet 
1 – My Acrylix® Spellbound Cricut® Workshop Stamp Set (C-size) 
1 – Sunset Baker's Twine (10 yards) 
1 – Foundry® Pin Clips 
6 – Jump Rings 
1 – Instructional Brochure
Some basic tools you may already have, such as inks, stamp blocks, or tools are needed to complete this project. The Cricut® Artiste cartridge is also required (Cricut® Artiste Collection Z1790).

$32.95 - G1040 - email me at kysprau@hotmail.com or order from my website 24/7 HERE!

Thursday, September 20, 2012

Bling Pumpkin

I saw a pumpkin (on Pinterest, of course!) that had these swirl patterns made out of cloves...and I thought "Hmm...that looks a lot like the CTMH Black Flourishes".  So without further ado...introducing my newest, scraplifted, brain child...


On the top, I hot glued two 'rows' (accordion folded) of the Black Tulle Ribbon (Z1798).  I thought it would lay a little flatter...when I first stepped back and looked at it, I couldn't help but think that it looked a lot like the top of Bert's, from Sesame Street, head.  BUT it's grown on me (no pun intended) and I like it!!

I also tried the white pumpkin in a stocking (as seen on Pinterest) ...my pictures were too dark.  I'll take more tomorrow and show you that one, as well.  Very cute idea!


Wednesday, September 19, 2012

Introducing Studio J Express Collection

Have you tried the new Express Collections in Studio J®? This new video shows you how easy they are to work with. Give them a try and get on board with Express Collections!


Stamping Across Multiple Services

Another great episode of 'Clearly the Best'...released, yesterday, on MyCraftChannel.com.

Stamping a continuous image over multiple surfaces is easy. Check out these tips and tricks for spanning your image across several surfaces for more creative freedom and fun!


Mark your calendar for next Tuesday's episode "Terrific Two-Tone". Check out the schedule
here http://www.mycraftchannel.com/Schedule/

Monday, September 17, 2012

Count Down to Halloween


This past Saturday I had the pleasure of being a vendor at the Male High School Cheerleader's Scrapbooking event.  I met a ton of wonderful women, got to show off all the new CTMH product and actually got a few things done...WHAT?!?
That's right...you heard me...
I worked with the new Moonlight Workshop-On-The-Go kit and completed this adorable frame, a two-page layout, and this little owl (which is eventually going in a frame of her own)!


If you'd like the cutting directions for this project, please look at the 'Countdown to Christmas' post from earlier this month.  I did a few things differently on this one...which I'll point out in each picture.


The flowers and the 'circle', that is behind the Chalkboard Sheet (Z1789), were cut using the Cricut Artiste cartridge. The purple ribbon is just something that I had in my stash, but the tulle is CTMH's new Black Tulle Ribbon (Z1798). I accordion folded it to get it bunched in the back and then attached it with hot glue!

Here I used the Cork Alphabet (Z1450), inked in black, and Bitty Sparkles.

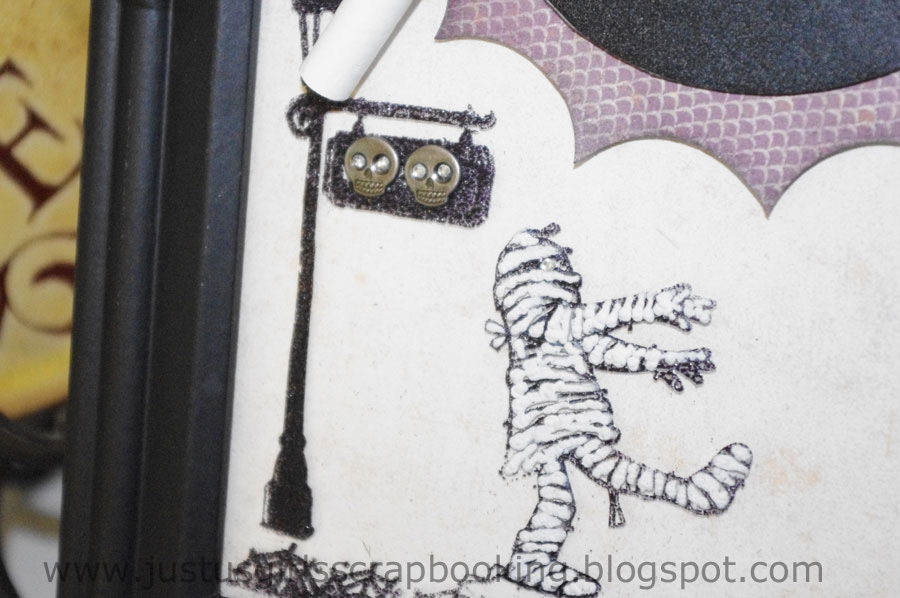
I embossed these images (WOTG stamp) on the outside of the glass, using black embossing powder.  Then I used the Liquid Applique to make the mummy 'puffy'.  The skulls on the sign are from the Haunted Assortment embellishment packet (Z1741) with Bitty Sparkles (Z1263) for the eyes.


This owl...however, too cute to hoot...wasn't what I planned when I started this project.  I saw the funniest owl with fangs, on Pinterest (of course!).  I was trying to replicate that 'fanged' owl using the Moonlight paper, but when I tried out the fangs...they just blended into the body of the owl.  So on to plan B...I had an extra olive flower, left over from the 'Count Down To Candy' frame, and ta da...a cute, girlie owl!


Cut with the Cricut Artiste cartridge...including wings & flower.  The scallops on the body were punched w/ our 2" Scallop Punch (Z1311).  Then I scissor distressed the entire outside of the owl and the wings.


The eyes are made using the NEW Treat Cup (Z1778) and Wooden Badge Buttons (Z1703).  I didn't have any black buttons so I inked these wooden ones.  Seriously!  If you could only see how many buttons I own...and I didn't have any black?!?  It still makes me shake my head.  Guess I'll just have to place another CTMH order this week...*smirk*

This is the Moonlight Workshop On The Go kit...such a cute layout!  And what about that stamp?  It is absolutely adorable.  There have been times when I am not exactly 'jazzed' about the WOTG stamp...but this one is definitely a keeper.


Workshops On The Go® Moonlight Scrapbooking Kit

Workshops on the Go® Moonlight Kit Contents
Moonlight Paper Packet
My Acrylix® Moonlight Workshop Stamp Set (C-size)
Colonial White Cardstock Sheets (2)
Sparkles Black & Grey Assortment
Haunted Assortment
Instructional Guide
Featured Colors: Black, Goldrush, Slate, Smokey Plum

$29.95 G1051


Thursday, September 13, 2012

Adding Color To Your Cards


Discover how to spruce up your designs with these new color families, cardstocks, and kit-exclusive papers. Adding color to your crafts is simple, easy, and beautiful!

Shop for any color in the new color palette 24/7 on my website (www.closetomyheart.com/sherrisprau) or stop by one of my crops and see them live..and in color! (Wokka, Wokka!)

Wednesday, September 12, 2012

Happy Trails Ahead


Recreate this adorable layout using the Dakota kit..this month's "Love Your Layout" video will show you how!  And you'll learn some fun tricks, to use in all your Studio J projects, along the way ...


Start your Studio J journey HERE!

Swipe And Stamp

Check out the lastest episode of 'Clearly The Best, Stamping with Close To My Heart' epsiode on My Craft Channel!


Learn how to add texture, distressing, movement, and motion to your projects by stamp swiping—a technique that will change the way you stamp.


Mark your calendars for the next episode, Tuesday, September 18th - "Spanning The Space"
http://www.mycraftchannel.com/Shows/Clearly-the-Best-Stamping-with-Close-To-My-Heart/

Friday, September 7, 2012

Bend It, Curve It, Stamp It!

Did you know that CTMH is now on My Craft Channel???? 

Discover the ease of creating new designs from stamp sets you already own. Personalize by using this new stamping technique. The versatility of clear My Acrylix® stamps makes it simple to bend, curve, and mix and match stamps to produce a completely unique design!


Don't miss the next episode....

Tuesday September 11

The Swipe Hype – Clearly the Best, Stamping with Close To My Heart

“The Swipe Hype” features the swiping stamping technique. With stamp swiping, you can add texture, distressing, movement, and motion to your products.

Easy Party Planning!


Learn how to plan the perfect party using one key from the Cricut® Artiste cartridge—it’s that easy! Invitations, envelopes, banners, cupcake liners, and party favor boxes will make this party a hit!


Get your Artiste cartridge TODAY...I'll even cover the cost of  your tax & shipping charges!!

Email me at kysprau@hotmail.com - payment must be made via PayPal.

Thursday, September 6, 2012

Crop Reminders!


Just a quick reminder of two crops coming up this month:

Saturday, September 15th - 9am - 9pm

Location: Okolona Church of Christ (6105 Outer Loop, Louisville KY 40219)
Breakfast, Lunch, Dinner included + Doorprizes
Cost: $35
Contact: Shawnda Styles (lstyles@aol.com)
Crop benefits the Louisville Male High School Cheerleaders
I'll be a vendor at this crop...if you can't come to crop for the day, please feel free to stop by and browse the new product line!

Saturday, September 22nd - 9am - midnight

Location: Courtyard Marriott - Louisville East (Blairwood Rd)
Cost: $25 ($15 after 3pm)
Contact me: kysprau@hotmail.com

Monday, September 3, 2012

Counting Down To Christmas...

I helped my daughter's Girl Scout troop make these SUPER CUTE "Christmas Countdown" frames last November....and they were a BIG hit.  This weekend  I decided to make one using our new Pear & Partridge Paper Packet (X7162B) and the BRAND SPANKIN' NEW Chalkboard paper sheet (Z1789)...which I love, love, love!  I've got a million ideas (for this paper) swirling around in this little brain of mine...some of them might actually make it out and into an actual project...

I'll start by sending out a huge apology for the crappy pictures...Ugh!  My cameras hate me.  BUT, you'll all be happy to know that I signed up for a beginners course in photography, this morning.  I saw a Groupon come thru and pounced on the opportunity...hopefully my pictures will take a turn for the better, very soon!


This is a 10x10 frame from Michaels craft store...retails for about $9.99, but they are 40% off this week PLUS I used the extra 25% coupon that was good for the Labor Day weekend.  Not exactly sure what the final price was, but it fell under the 'pretty darn cheap'category in my mind.  I will warn you though...the glass is super thin, so be very careful when handling ...I've cracked my fair share of these puppies!

Supplies Used:


  • Cricut Art Philosophy cartridge - used to cut the scallop border at top, scallop circle behind blackboard paper, flowers, and tree. (Z1686)
  • Pear & Partridge Paper Packet (X7162B)
  • Holiday Dimensional Elements (Z1772)
  • Chalkboard Sheet (Z1789)
  • Canvas Alphabet (Z1777)
  • Clear Assortment Sparkles (Z1752)
  • Harvest Assortment Baker's Twine (Z1751)
  • Designer Ribbon_Red Collection (Z1615)
  • Designer Brads_Antiqued Copper (Z1410)
  • Cashmere ink pad (Z2175)
  • Chocolate ink pad (Z2111)
  • Liquid Glass (Z679)
  • Glue Dots (1772)

Art Philosophy cuts:
Scallop border was cut at 1 1/2"
Scallop circle was cut at 4 1/4"
Flowers  (poinsettias) were cut at 3" (x2) and 4" (x4)
Holly leaves were turned length-wise and cut at 1 3/4 " (x6)
Tree was cut at 6" (3 of them, glued together for the 3-D look)
Blackboard paper circle was cut at 3 3/4"


Paper cuts (all under the glass):
The background paper is cut at 10x10".
I used a 10x2" strip of the green B&T paper
The red floral piece is a zip strip off one of the B&T papers
Cashmere sheet is 6x6 - randomly stamped and sponged in cashmere ink

Embellishments (on top of glass & around frame):

  • The tree is 'decorated' w/ sparkles and baker's twine faux bulbs.  I took large glue dots and just winded the baker's twine on top...using a little liquid glass to help fix the extra twine on top.
  • The presents are from the Holiday Dimensional Elements
  • Flowers and holly leaves have some sparkles on them.
  • Although you can't see them...there are a couple of  antiqued copper brads glued in both sets of flowers.
  • Scalloped circle is B&T paper glued to chipboard, which I sanded and then sponged in Chocolate ink.
  • 'Days til Christmas' is spelled out using the new canvas alphabet.  At first I tried inking them...but it made them too dark and hard to see w/ the paper patterns that were behind the glass.  So, I kept them 'as is'...much better!
  • Ribbon around the chalk is glued on there w/ Liquid Glass (again!) and then I attached it to the frame w/ a little piece of Velcro.
Don't let the list fool you...it is actually a very easy project.  If 15 fourth graders can put one (each) together in about an hour...just think what you can do?!? Give it a try ...and send me any questions.
Thanks for visiting!


Sunday, September 2, 2012

More cards & layouts...

Finally getting around to posting some of the cards/layouts that I completed at my weekend crop...last weekend!  

The first four cards were given to me at the CTMH Convention in July.  I made a couple of tweaks...overall, I am pretty happy w/ how they turned out.
Not a huge fan of the second one...don't know why...just not my color scheme, I guess. 


This layout is of the girls' first concert...Loverboy, Pat Benatar, & Journey.  They came to the KY State Fair two weeks ago.  The last two pictures are to show the 4x6 flip flap (containing the tickets) that I plan on attaching to the page protector.


Saturday, September 1, 2012

Patterns From The Heart!

Take a peek at one of the single-page scrapbook patterns—great for the opening page of your album—in our Make It from Your Heart® publication. With both card and scrapbook patterns included, you’ll turn to this publication time and time again!


This softbound, affordable how-to publication features 16 two-page layout patterns, 2 single-page patterns, as well as 12 different card patterns. Inspired by Jeanette Lynton's Let Me Show You How® philosophy, the patterns are the same as those found in the Workshops on the Go® cardmaking and scrapbooking programs for 2012–2013. This publication highlights all-new artwork, technique ideas, and color palettes, conveniently bound in one volume for easy reference.

Just $7.95 (Item# 9035) - order from my website 24/7 - www.closetomyheart.com/sherrisprau